And back in action with my first blog tutorial since the fiasco!
This is sort of a double tut, I show photos of the step finished, as well as a drawing (actually a quickie sketch). Please note that the colors of the drawings are not meant to match perfectly with the actual colors, I don't have pencils that matched. Also, please ignore my skin and brows, I wasn't going anywhere today so I just dusted on some powder and haven't felt like plucking.Tools and Cosmetics Used:
- Small/medium eyeshadow brush
- Medium stiffness angled liner brush
- Urban Decay Primer Potion (Original)
- NYX Jumbo Eye Pencil in MILK
- MSC "Madd Piggiez"- Xray Spex, Cry Baby, Ol' 55, Zombie Crush, Young Blood, Peep Show, Blister in the Sun, Tweaker, and Boognish
- Black pencil liner (I believe Rimmel Special Eyes)
- Physicians Formula Felt Tip Liner in Ultra Black
- Brow Pencil or Powder in a shade close to your natural brows, or your hair color!
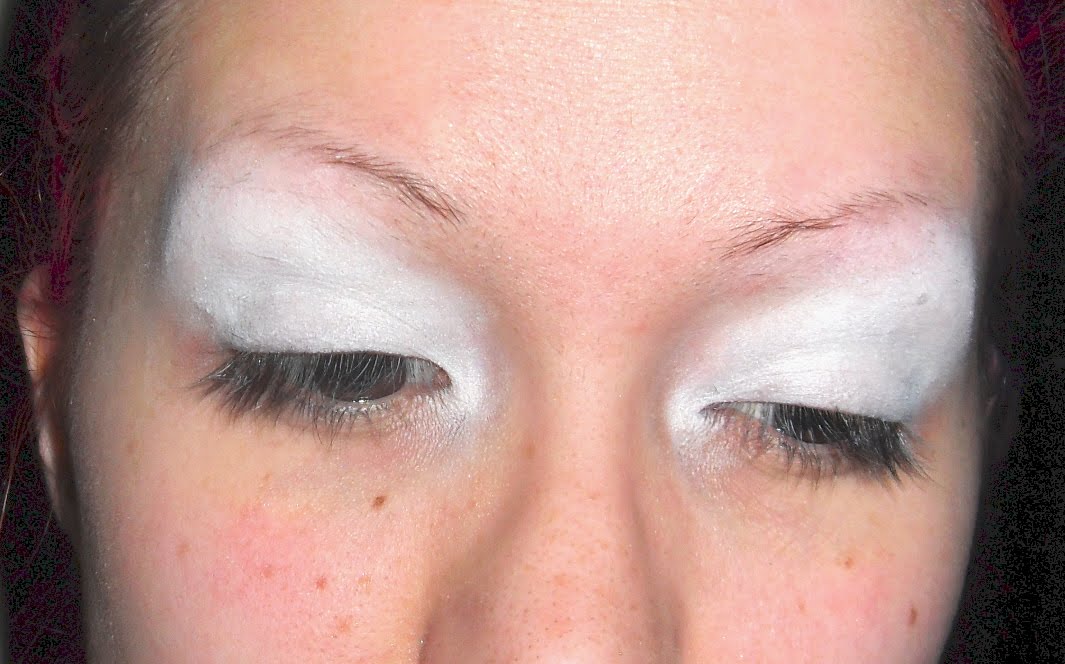
STEP ONE: Clean Dry Lids, Primer


- Make sure your lids are clean, and dry. Apply some primer to your finger and smooth onto both lids. Use sparingly and let dry around 5 minutes. I take this time to grab out all of my shadows and pigments to use, apply powder or foundation to my face, even pluck at my brows a little bit.
STEP TWO: Base
- Take the NYX pencil and scribble gently across lids, this does not have to be pretty as you can see below, we will be blending this soon. You could also use white kohl liner, or white cream shadow.

- Take your finger and pat at the base you just applied, working your way upward and eventually smudging edges some. You want it to end up like so....

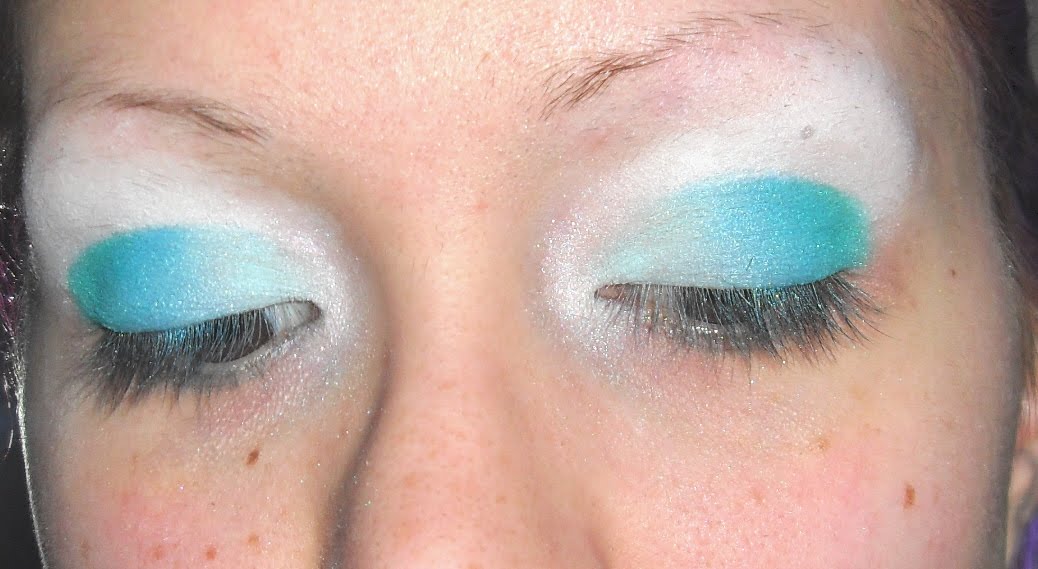
STEP THREE: Begin with Pigments, Xray Spex and Cry Baby


- Using the shadow brush PAT on xray spex to your inner corner/ducts. Then pat cry baby on the inner third, blending slightly deeper than 1/3. Stay strictly on lid, not straying above or on to the crease (I should listen to my own instructions more) This is a cut crease look.
STEP FOUR: Ol' 55


- Using the same brush for the rest of the lid, pat Ol' 55 on the second third. Again blending out past that third. But careful to not stray over the crease. Also, pat to blend back over into cry baby. If you must sweep, keep them slight and short.
STEP FIVE: Zombie Crush

- Pat Zombie Crush on to the remainder of the lid, patting back over into ol' 55. You will now have a nice fade from light to green.
STEP SIX: Cut That CREASE! Young Blood


- Using the angled liner brush, dip into Young Blood and tap of excess, pat/draw a line on your crease past the middle, but not all the way to the inner corner.

- Still using the liner brush, blend YB outward and upward slightly (thicken the line). This is to assist blending into the next color.
STEP SEVEN: Peep Show


- Back to the shadow brush, Pat and blend Peep show above the crease in the hollow, sweeping in gentle quick motions down into and across the rest of the crease.
STEP EIGHT: Blister in the Sun, Xray Spex, Tweaker


- Pat and blend some Blister in the sun on the orbital bone across the top/middle of peep show. Bring only to middle of the eye, similar to how we did YB. Then take some xray spex and blend upward with the middle half. Xray spex is represented in the drawing with a pastel yellow. Using Tweaker, Highlight the brow, and blend into Blister in the Sun.
STEP NINE: LINER


- I use some of my pencil liner to first line the top lash. For me, this darkens my liquid liner and keeps the felt tip nice by not picking up any pigment. This is not photographed.
I then took the felt tip liner and lined my upper lash line, extending up and outward into a semi dramatic wing. My eyes tilt down on the outer corners so I do this more dramatic than most to cover that up and give the illusion that my eyes do not sit that way.

- I also line the waterline with the pencil liner
STEP TEN: Lower Lashline Boognish, BitS, Liner, Brows


- The last few steps include taking that angled liner brush, and applying a line of BitS to the inner half of the lower lash line. After that, dip into Boognish, and apply to the outer half, following up to slightly outside the end of the wing.
- Then, taking the felt tip liner again, I line my lower lash line. Keeping it thin until the inner corner where i thicken it to continue on with the illusion of my eyes tilting down on the inner corner, not the outer.

- Also, Now is when I do my eyebrows. As you can see I have very sparse and thin brows, I rather it this way. I take a medium brown eyebrow pencil and draw them on as I usually do. Then, because my hair has purple in it, I use the angled liner brush and tap it onto a purple pressed shadow. I then dab and reline my brows with it, Setting the liner and tinting them to match my hair.
FINISHED LOOK! I hope you enjoyed it. I would love to see some links in the comments to your version or attempt at this look! Until next time,....

♥ Brandy MMB ♥
LOVELY Brandy-pants!
ReplyDelete*huggles*
BEST photo tutorial that I have ever seen. Very detailed. Thanks!
ReplyDeleteThanks girls! So you like the way its set up? It helps? You want to see more like this? Jackie ^ Tiny_Mama has a request of me so maybe ill get a new one up this week!
ReplyDelete