Wednesday, February 23, 2011

Madd Style Cosmetics Photo Tutorial: Jackie QR

If you read my last entry, This is for and named after my dear Jackie M ♥ As she requested a dupe tutorial for a look I had done. Sadly I didn't remember all the colors I used. I know the green for sure is different. I used Soylent Green in the original look. But wanted something brighter this time around.
The sketches for this tutorial are more... sketchy haha. I did them quicker than last ones. Please ignore this. Also as with any tutorial I do like this. The colors shown in the sketches may be quite different from the actual colors I use. This is because 1. I don't have exact colors to match, 2. It helps keep a difference between colors to help YOU see them.

Cosmetics (Mostly Madd Style) and Tools Used:
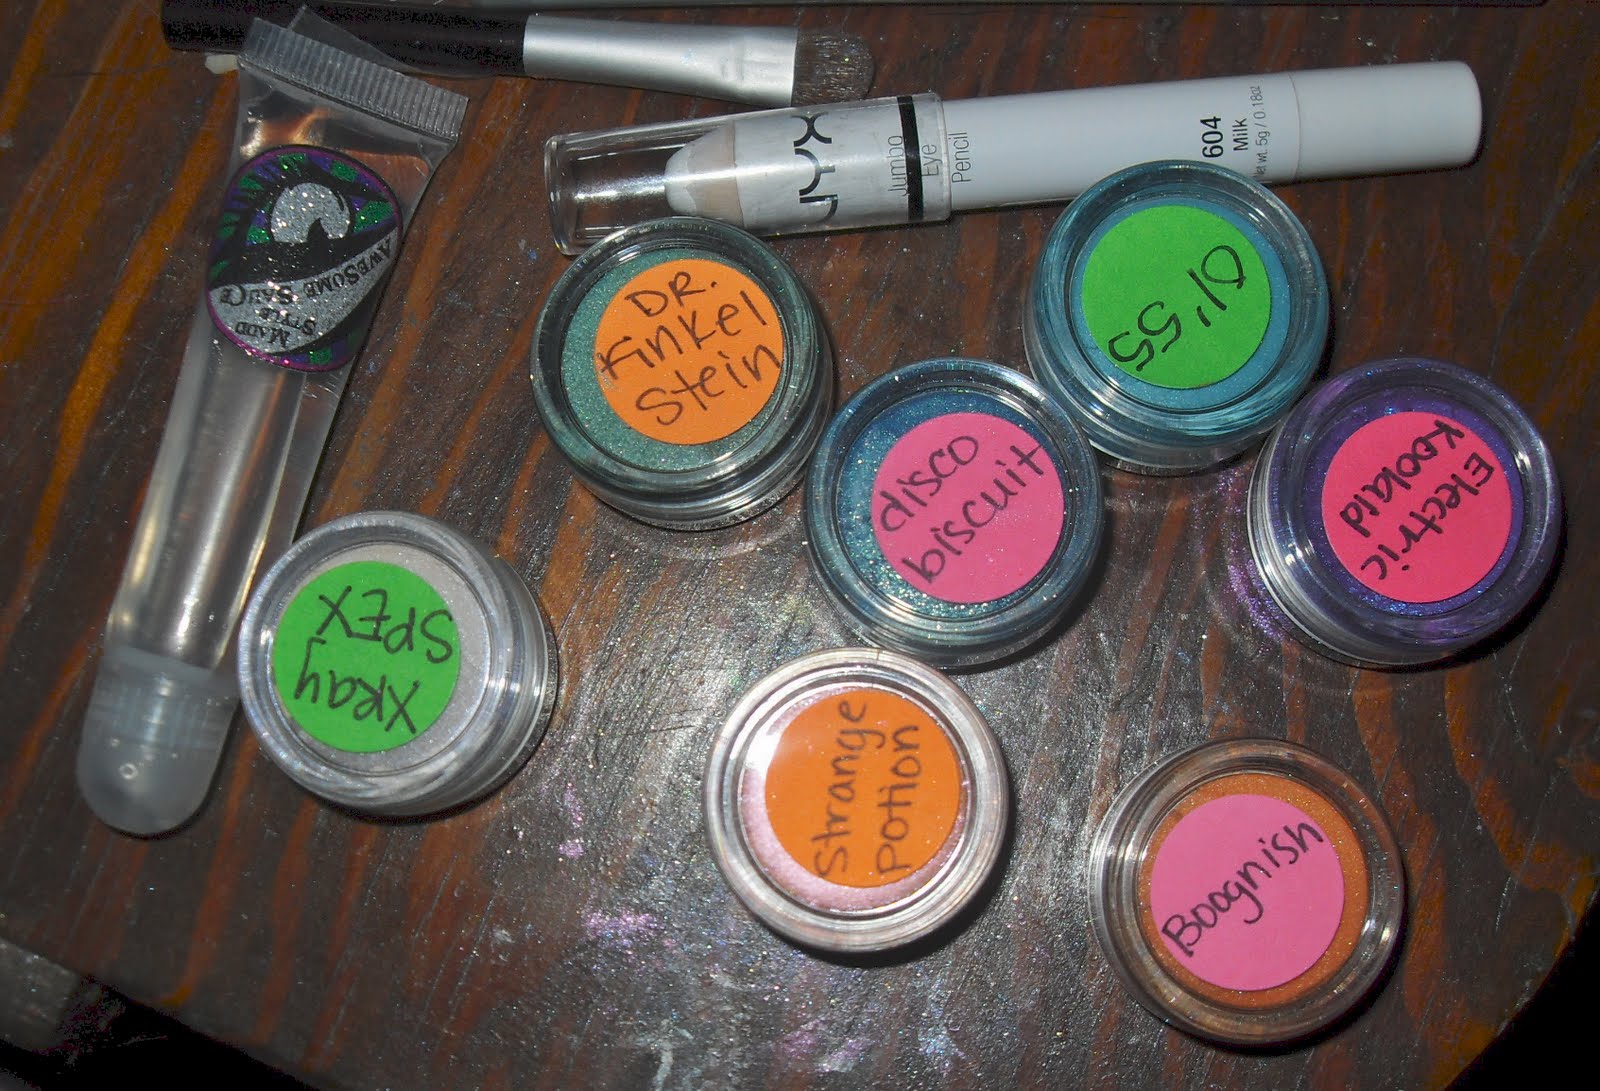
  • NYX Jumbo Eye Pencil in Milk
  • Urban Decay Primer Potion (original)
  • MSC Awesome sauce (foiling serum)
  • MSC "Madd Piggiez" - Strange Potion, Boognish, Disco Biscuit, Ol'55, Xray Spex, Electric Koolaid, and Dr.Finklestein from the Nightmare Before Christmas Collection
  • Physicians Formula Felt Tip liner in Ultra Black
  • HIP Navy Pencil Liner
  • Small Eyeshadow Brush
  • Medium Semi-Fluffy Eyeshadow Brush
  • Medium Stiffness Angled Liner Brush
  • Medium Stiffness Crease Brush

STEP ONE: Clean Dry Primed Lids
I have no photos for this, this time around. I sort of found them pointless. You know what clean dry lids look like. This is where I apply some UDPP to my pointer finger, and apply a thin layer to both lids. Allow to dry 5 minutes or so. During this time I grab out everything I will need... and sometime dance around the room!

Here is a photo of the pigments and AS we will be using!


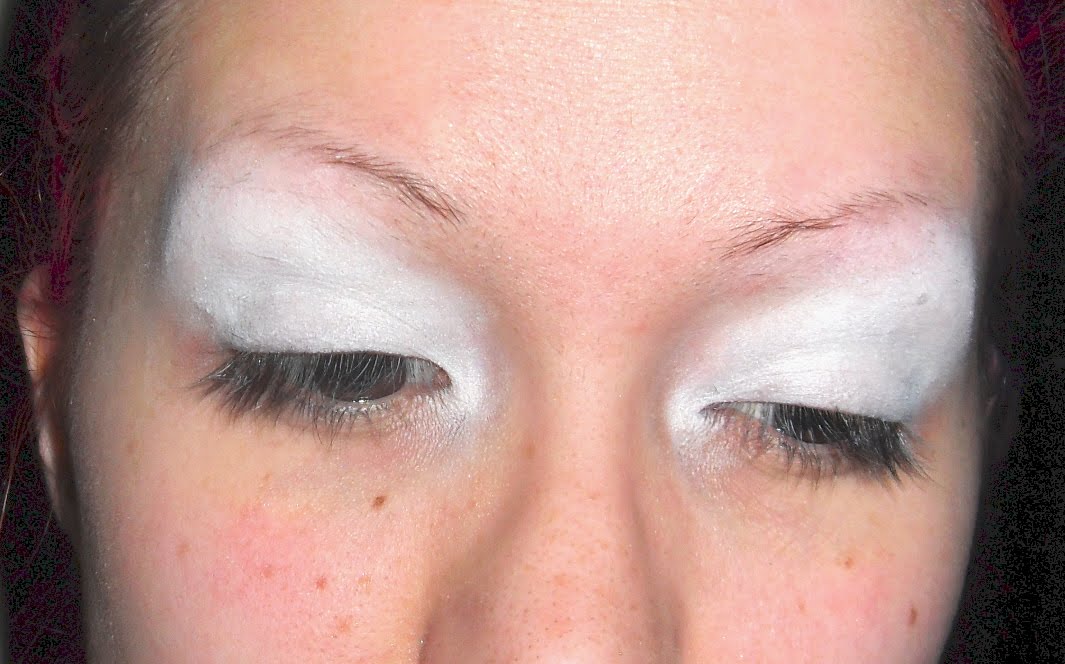
Step Two: NYX and Awesome sauce
Next, as I always do, We scribble some NYX milk on our lids. I like it REALLY white. Some use their fingers because they like a sheerer look. But for me, I like it bold, And a nice white base really makes the colors POP! I then pat (second picture) to blend, smudging at edges.

After that, Get a teeeeeeeeeeeeeeeensy bit of Awesome sauce on a finger tip. I rub this between my two pointer fingers. I then pat and smooth this on to my lids. You never want too much. Too much will crease and even sometime just make your piggies bead up. Weird. So I make sure I only put a little on at a time, patting more if needed. Then smoothing to assure myself that it doesn't bead up.
Foiling mediums used in this way help keep glitter on, and "foil" your pigments. Making them look bolder, brighter, and even more metallic!


Step Three: Make your Crease, Strange Potion
Strange potion is becoming a new fave for me. Its a soft orange with a wicked pink duochrome! So awesome sauce is perfect when using this. It brings out that shimmer of pink even more.
Using your angled liner brush, tap and pat on or slightly above your crease. This does not have to be perfect but it starts the outline to keep our cut crease CUT! Bring this down onto the ducts, as we will not be having a duct highlight for this look.


Step Four: Strange Potion
Using your stiffer eyeshadow brush, pat strange potion onto the inner 2/3 of your lid. After I do this I like to swipe a little more on, I find that with some pigments such as SP this brings out the chromeyness! (Which is so hard to capture on camera)


Step Five: Boognish
Boognish is a red toned orange with silver and aqua glitter *hugs* and I love it! Using the same eyeshadow brush you used for SP (but dusted off onto a clean towel or tissue) pat some Boognish onto the remaining 1/3 of the lid. Blend into the SP, but keep inside the lid.


Step Six: Disco Biscuit
"DISCO BISCUIT : a deep, primary blue with gorgeous teal undertones and a GROOVY amount of silver DISCO glitter!" - Said by Madd Style's Madd Scientist herself, Mo Love! And oh is it true. Using that brush, pat a small amount ABOVE the crease from outer corner to middle. This is just to assure that this section will stay darker.
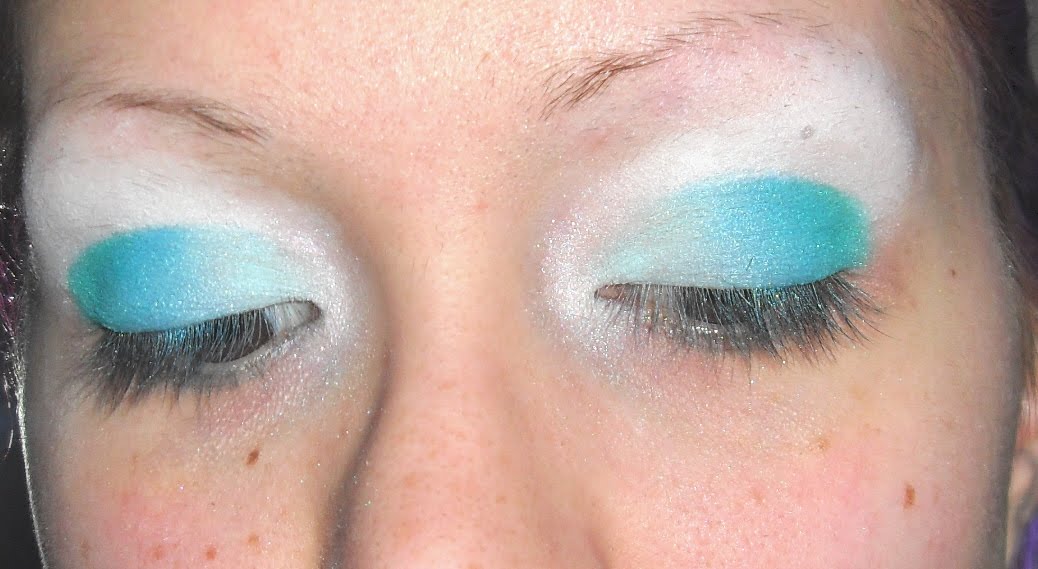


Step Seven: Ol'55
Ol'55, which I used last Tutorial. Is .... *drools*... tasty. Its quite literally the perfect most absolutely amazing aqua color. Still using the same brush (cleaned off again obviously!) Pat some from outer corner to inner corner. Going above DB and down above SP. DO NOT BLEND IN ANYWHERE. Don't worry about harsh lines. We want some of those, We will rid ourselves of some later. The only place you are allowed to blend here is into DB.


Step Eight and Nine: Xray Spex, Disco Biscuit Gets Wet O.o
Xray spex is described as "a super soft neutral color perfect for highlight! Loaded with colorful shimmer and a pink duo chrome iridescence." It also is quite sparkly! and is one of my favorites as a neutral highlight or blender. Which is how we are using it here.
Now switching to the fluffier eyeshadow brush, take some xray spex and blend Ol'55 upward, softening the edges. When this is finished, take some more and build it up a little on the brow bone to highlight. This is not shown in an actual photo step. Because I am a doof.
Also, We are going to take Disco Biscuit wet to crisp up that cut crease. Using your angled liner brush dampened (I use eye drops), take some DB and re-line your crease. Keeping everything nice and clean. Then blend this upward into Ol'55.


Step Ten: NYX Milk Reappears!
Using a makeup wipe clean off your angled liner brush, and set the wipe aside, you will be cleaning it again. (unless you have multiple angled liner brushes of a similar stiffness.)
Rub the angled liner brush against the tip of the Milk pencil, loading it up. Then apply under your eye on the lower lashline. The thickness here will determine how thick your green will be. This isn't necessary, it just makes the pig pop! Extend out and up to where you want to position the purple as well. Clean up edges with finger or makeup wipe.


Step Eleven: Dr.Finklestien
I have to admit I avoided using this pigment because in the pot in seems on the duller side of greens. And I am far from a dull type of person. But holy shit I was wrong dude. Its just as described in the listing. A shimmery Primary green with Royal purple glitter. And its awesome.
Using the crease brush, pat Dr.F on the lower lash line. Be sure to leave a gap for that purple wing that's coming! if you need to add more later to fill in gaps you may of course!


Step Twelve: Electric Koolaid
You remembered to use that wipe and clean off the angled liner brush right? You didn't? I'll wait. Do that now...

Okay, Clean? Good. Now we take whatever you like to use to wet your pigments again, and Electric Koolaid. EK is a gorgeous purple with super vivid blue shimmer. For this I like my pigment not to be used damp like we did DB, but wet like a liquid liner. So I set a drop of eye drops onto the back of my hand, and mix in small amounts of EK until I get the right pigmentation and consistency.
Then take that angled liner brush and make a swipe from the corner outward where you want to place the wing. I do it right at the corner so I have room to line up my top liner later. I build upon this sometimes if it doesn't go on dark enough.
During this step I also lined my waterline with the HIP liner.


Step Thirteen: Finish
Now I take my Felt tip liner, and line my top lashline, winging outward and lining it up against the edge of the purple wing so from a distance it appears to be one. I also bring it down into an inner wing to give it more of a cat eye appearance. I blended this into my lower lash line slightly. So there isn't a harsh stop of liner.


And VOILA! The Jackie QR ;)


Till next time everyone!
♥ Brandy MMB ♥

Tuesday, February 22, 2011

New Tutorial Coming! I think we shall call this... Jackie.

Well. My dearest Jackie M is the one who begged for a tutorial on this look:


It isn't exactly the same. I can't remember all colors used for that ^. I know I used the two oranges; Boognish and Strange Potion. But the rest is sorta fuzzy.

Here's the Sketch Plan! Tutorial is done, I just need to crop the photos, compile them all together, and post with words! =P (So... I got it photographed... okay?)


Enjoy! Tut to come ASAP!


♥ Brandy MMB ♥

Sunday, February 13, 2011

Lippos, Luckies, Labs?: Lip paint experiments with one extra surprize.

Wow another post?! Before you freak out and think I may actually be keeping up on this, calm down. I'm not nearly that active! I just got seriously bored last night and entertained myself (and a few others on facebook!) with some lip paint experiments.

So, Back story... I stumble sometimes. As in, www.stumbleupon.com .
And a while back i stumbled upon a list of pictures of REALLY CUTE lips with creatures and animals on them, also of nails. I shared this with some of the girls, and someone sent me to another site of the lip paints girl! ( http://www.inewidea.com/2011/02/08/36793.html )
Point is, Last night upon reaching a certain level of bored. I deemed it necessary to dupe the crab. So I did!


I used a strange mix of MSC awesomesauce, a glitter adhesive, and pigments (MSC Boognish, the mayor, and a random non msc red) before landing on mixing in lip gloss too. I used liquid liner for the eyes.


I then also realized, with no offense meant to the girl who did these, that I did not enjoy her hippo. Hippos are by far my MOST favorite animal EVAR. I then did my own version!


Again, mixed awesome sauce with some glitter adhesive, mixed in a bit of gloss too. More AS this time though. Used MSC pigments in Pixie, Electric Koolaid, and Mondo. Black liquid liner. (and some celery leaf for prop.)

Then my dear friend, Jackie "QR" Queen Ruler of The Universe suggested a duck, I had not seen a duck on the lip paint page. So naturally I did it. She is Queen Ruler after all. And we submitted it to Antiduckface.com for shits and giggles ;)


This time I used NYX milk for the yellow part, and patted MSC Blister in the Sun over. Then used Boognish and gloss for the lips, accenting with an Estee Lauder Lipstick in Fig.


I also felt the need to dupe a Hello Kitty look we found somewhere I can not remember. So here that is!


The photo lists it, but its too small. I used NYX milk, and did not pat or blend. Outlined with a hard black pencil liner, patted on MSC Tweaker, used a random red for the bow, and MSC BitS mixed with another random yellow for the nose. Re-outlined with UD 24/7 liner. Then lined my lid and did the eyes with felt tip liner.


Whats next eh? Octopus? Cow? =P


♥ Brandy MMB ♥

Saturday, February 12, 2011

Madd Style Cosmetics Photo Tutorial: Sunrise Over the Ocean

And back in action with my first blog tutorial since the fiasco!
This is sort of a double tut, I show photos of the step finished, as well as a drawing (actually a quickie sketch). Please note that the colors of the drawings are not meant to match perfectly with the actual colors, I don't have pencils that matched. Also, please ignore my skin and brows, I wasn't going anywhere today so I just dusted on some powder and haven't felt like plucking.

Tools and Cosmetics Used:
  • Small/medium eyeshadow brush
  • Medium stiffness angled liner brush
  • Urban Decay Primer Potion (Original)
  • NYX Jumbo Eye Pencil in MILK
  • MSC "Madd Piggiez"- Xray Spex, Cry Baby, Ol' 55, Zombie Crush, Young Blood, Peep Show, Blister in the Sun, Tweaker, and Boognish
  • Black pencil liner (I believe Rimmel Special Eyes)
  • Physicians Formula Felt Tip Liner in Ultra Black
  • Brow Pencil or Powder in a shade close to your natural brows, or your hair color!

STEP ONE: Clean Dry Lids, Primer


  • Make sure your lids are clean, and dry. Apply some primer to your finger and smooth onto both lids. Use sparingly and let dry around 5 minutes. I take this time to grab out all of my shadows and pigments to use, apply powder or foundation to my face, even pluck at my brows a little bit.
STEP TWO: Base
  • Take the NYX pencil and scribble gently across lids, this does not have to be pretty as you can see below, we will be blending this soon. You could also use white kohl liner, or white cream shadow.

  • Take your finger and pat at the base you just applied, working your way upward and eventually smudging edges some. You want it to end up like so....


STEP THREE: Begin with Pigments, Xray Spex and Cry Baby


  • Using the shadow brush PAT on xray spex to your inner corner/ducts. Then pat cry baby on the inner third, blending slightly deeper than 1/3. Stay strictly on lid, not straying above or on to the crease (I should listen to my own instructions more) This is a cut crease look.
STEP FOUR: Ol' 55


  • Using the same brush for the rest of the lid, pat Ol' 55 on the second third. Again blending out past that third. But careful to not stray over the crease. Also, pat to blend back over into cry baby. If you must sweep, keep them slight and short.

STEP FIVE: Zombie Crush


  • Pat Zombie Crush on to the remainder of the lid, patting back over into ol' 55. You will now have a nice fade from light to green.

STEP SIX: Cut That CREASE! Young Blood


  • Using the angled liner brush, dip into Young Blood and tap of excess, pat/draw a line on your crease past the middle, but not all the way to the inner corner.

  • Still using the liner brush, blend YB outward and upward slightly (thicken the line). This is to assist blending into the next color.
STEP SEVEN: Peep Show


  • Back to the shadow brush, Pat and blend Peep show above the crease in the hollow, sweeping in gentle quick motions down into and across the rest of the crease.

STEP EIGHT: Blister in the Sun, Xray Spex, Tweaker


  • Pat and blend some Blister in the sun on the orbital bone across the top/middle of peep show. Bring only to middle of the eye, similar to how we did YB. Then take some xray spex and blend upward with the middle half. Xray spex is represented in the drawing with a pastel yellow. Using Tweaker, Highlight the brow, and blend into Blister in the Sun.
STEP NINE: LINER


  • I use some of my pencil liner to first line the top lash. For me, this darkens my liquid liner and keeps the felt tip nice by not picking up any pigment. This is not photographed.
    I then took the felt tip liner and lined my upper lash line, extending up and outward into a semi dramatic wing. My eyes tilt down on the outer corners so I do this more dramatic than most to cover that up and give the illusion that my eyes do not sit that way.


  • I also line the waterline with the pencil liner
STEP TEN: Lower Lashline Boognish, BitS, Liner, Brows


  • The last few steps include taking that angled liner brush, and applying a line of BitS to the inner half of the lower lash line. After that, dip into Boognish, and apply to the outer half, following up to slightly outside the end of the wing.
  • Then, taking the felt tip liner again, I line my lower lash line. Keeping it thin until the inner corner where i thicken it to continue on with the illusion of my eyes tilting down on the inner corner, not the outer.


  • Also, Now is when I do my eyebrows. As you can see I have very sparse and thin brows, I rather it this way. I take a medium brown eyebrow pencil and draw them on as I usually do. Then, because my hair has purple in it, I use the angled liner brush and tap it onto a purple pressed shadow. I then dab and reline my brows with it, Setting the liner and tinting them to match my hair.
FINISHED LOOK! I hope you enjoyed it. I would love to see some links in the comments to your version or attempt at this look! Until next time,....


♥ Brandy MMB ♥

Friday, February 11, 2011

NEW HAIR! Black and White Bases. And a Drawn up soon to be shown Tutorial Teaser.

HAI GAIIIIIZ! =]
Ohhkay. So. Like I said, Back in semi sorta action. Kinda. I'm still getting in the swing of things, I forget I even have one of these!

POINT! I recently changed hair colors again. Pictures to follow this bit. I had pravana orange and magenta in, faded quite an awful lot, and atleast 2 months of roots. I bleached the roots and a little below, and picked my colors! Back to Special Effects. I liked pravanas staying power I can not deny it did stick like crazy! However, Cons: It faded unevenly for whatever reason (not just where i used products), ITS NOT AS COOL. Plain and simple. Pravana Vivids, though are indeed vivid and bright. ARE NOT as multidimensional. They are flat, not dull, but flat indeed.
So anywhoozer, I went back to SFX. I chose this round to again use Atomic Pink, A little bit here and there of Hi octane/Napalm orange mix, and some accents of Wildflower.
PLEASE NOTE: It looks reddish because i put pink over existing faded orange. As it lightens it will be more pink.
Enjoy.


And now that Blogger is being weird with my pictures. Moving on!

I hear a lot of "What exactly is a black and white base? How does one do that?" and "HUH?!" Even though there are many you tube tuts out there. I have some pictures to share of last nights look. Using Madd Style Cosmetics (UIS White, Mr Roboto, Non ms silver, UIS Med Gray, A non ms black, Frankenstein, Ecto Cooler)
Not really step by step, but chunk by chunk, just to show you all what a black and white base looks like in general, and how the look is over top of that.
In this case I used it to keep my white and silvers BRIGHT and to darken my black. I used NYX pencils over UDPP. Milk and Black Bean. I also put MSC Awesomesauce (foiling serum) over top of my bases to foil my pigments and make them more metallic. Also to keep that glitter on!


Just Bases. Pat to blend. Patted on and Blended Pigments


Finished Look. MSC Subzero over a similar Base.

See how in the look, it accentuates the vibrancy? And then in the last photo, it makes it appear as if I am wearing more than one shade? When in reality, I just did that base, and patted Subzero (and white and blue duochrome!) all over the lid from brow to lashline.
Last photo to share is just a teaser. A cell phone shot of the drawing i did to assist in my next photo tutorial instead of the usual me pic. ;)


♥ Brandy MMB ♥